Centerpiece
Modelling The Iron Maiden
 |
| Shaping The Face |
Sculpting The Basics
I started off with a rough blockout in Maya. This was literally just the most basic outline of the object I could get, that I could start pulling details out from using clay buildup brush, smooth, dam standard and hpolish. In the beginning I was a bit lost, but I ended up just going back to a 3D sphere in Zbrush for the head. This was the most time consuming part. Getting the shapes down.
My most used brushes during this process was Clay buildup, smooth, hpolish and damstandard. Clay buildup was for the bulk of the shaping. Using this with the wacom tablet's pressure sensitivity to build geometry quickly, and dynameshing every so often when I add a large piece to keep topology constistant for sculpting. Smooth brush was also essential as the shap itself is very smooth, but for the sharper edges, I would use damstandard with hpolish to build up of down to the edge. This would create strong creases, but could also be used to create organic shapes easily with by smoothing and hpolish.
 |
| Fianl Sculpt |
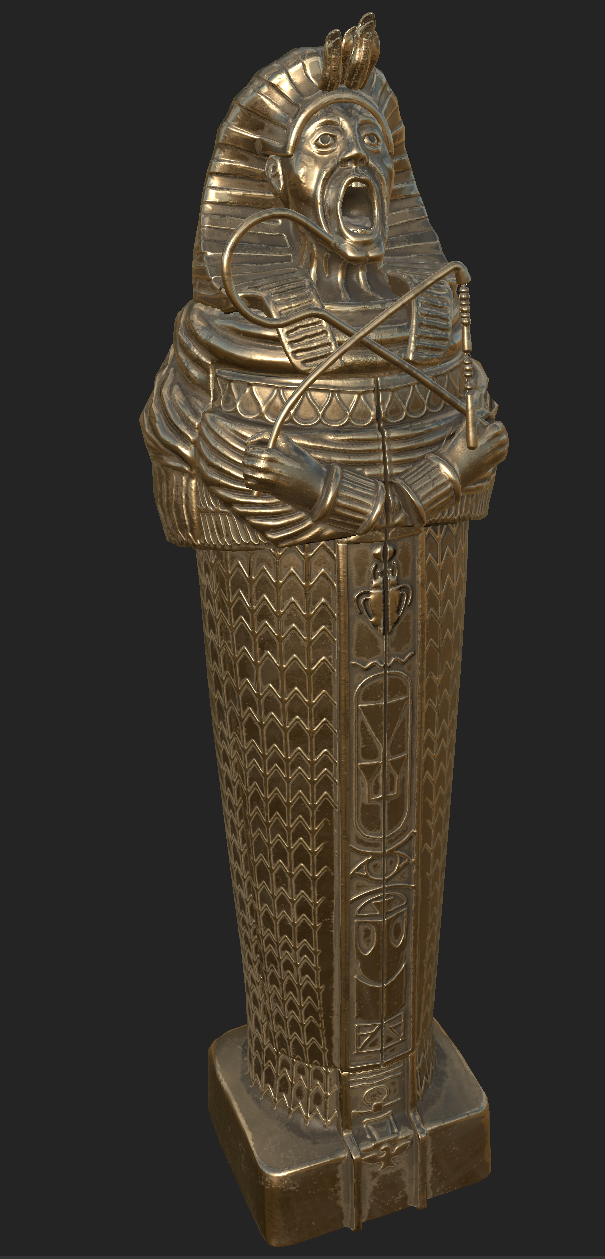
Powerful ZBrush Features
This was the last progression of the sculpting process for the iron maiden. For the arrow designs going all around the bottom 2/3rds of the sarcophagus, I used shadow box alnog with an alpha in Photoshop to create one iteration of the arrows. I then used arraymesh to duplicate this in a ring around the entire mesh, and to get it to sit on the mesh, I just used the move brush and pushed it towards the model till it sat flush all the way around.
The artifacts that are in the hands were modelled in Maya entirely. Once I've textured it, I will add more beaded tassles to the stick and then probably bring back the low poly mesh into Zbrush and use the move tool to get it to curve slightly.
I was originally going to have it completely symmetrical, but I thought that wouldn't be as interesting, so I opted it make it assymetrical. That way theres just more detail to look at.
At the end of the sculpting process, I added some basic noise to the surface, just to break it up a little. It's quite subtle, but I thought it would be necissary, as a real sarcophagus would most likely have damage and imperfections along the surface, whether it was made out of stone, clay, metal, etc.
One thing I will need to do for the textureing will be to create an ID map as the way I want to texture it requires a lot of detail and colours. This means that if I can create a mask used from the high poly, this will literally saves hours of hand painting.
References Used
 |
| Ironmaiden inspiration |
 |
| Sarcophagus inspiration |
 |
| Face of ironmaiden |
For the face, I didn't want it to be a normal head or sarcophagus design. Story-wise, this 'device' was used for a dark ritual, so I wanted something that would convey pain, misery, fear, etc. This is why I chose to do a screaming face for the top of the iron maiden.
Despite wanting it to be different to a normal Egyptian sarcophagus, I still needed to make it feel like Egypt, so I opted to keep the headdress that Egyptian pharoahs usually wore because it tells you right away, "Egypt!". The rest of the iron maiden will also be inspired by a sarcophagus so that it won't look out of place in the environment I'm creating.

Quad Drawing & UV'ing
Now that the highpoly mesh is essentially done, I can start getting the low done. For this I pre-processed all of the subtools in ZBrush, and then decimated everything so that I could import it into Maya without it crashing, as Maya cannot handle nowhere near the amount of polys ZBrush can. Once I did this, I exported all of the highpoly meshes from Maya as an alembic file (gpu cache) and reimported that file type while discarding the original. I'm pretty sure this makes it so that the GPU handles all of the work so that it doesn't lag as much. Something like that.
First thing I quaddrew was the head and body, then the doors, then the snakes on the headdress. The face was the hardest part and I am no character artist so topology wise, it most likely could be a bit better. Right now, it's looking a bit heavy poly wise than I would like, so I'm sure I can maybe go back and crunch down on the amount of polys around the face, but other than that, It should do for now. The artifacts in the hands were modelled completely in Maya, so the low and high were done simultaneously, so that was quick and easy.
Next, it was time to UV. I currently have three materials for this mesh. One for the face, body, headdress, eyes, tongue, teeth, snakes. One material for the doors. And one for the artifacts. The artifacts can be 1K, the doors I can probably get away with 2K and the rest, can maybe be 2K or 4K as that contains most of the mesh and the UV space is pretty dense so I might need that extra resolution. I think I could get away with it as it is a hero asset. If not, I might decide to break it up further and add another 2K textureset and split it.
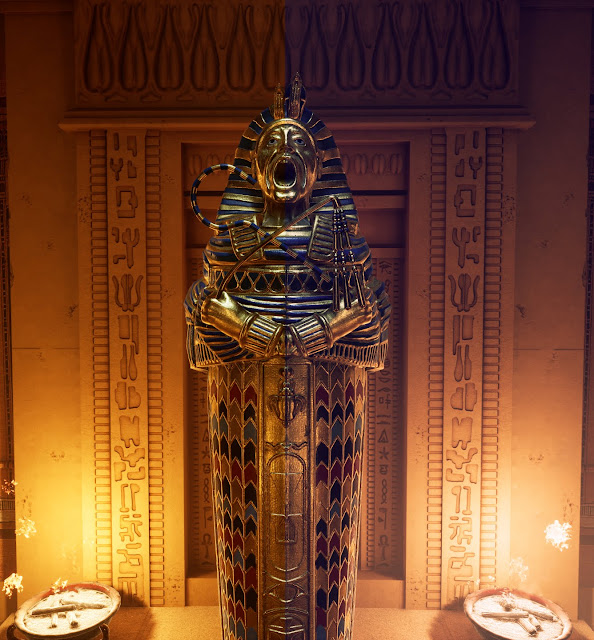
Texturing
Now that I have everything UV'd, it's time to see how well it will bake. I went back to ZBrush and cleaned up the ZTool. renaming all of the subtools to what I need, etc. I then exported it to Maya again and made sure position was correct, naming conventions..Exported it again from Maya as as FBX and then threw the low poly into Substance Painter. I set up the baking options to bake by mesh name and then pressed the magic button. This part is always nerve-racking for me as I'm always nervous I will get a completely messed up bake, which sometimes happen if you forgot to rename something completely correct, or forgot to assign everything it's correct materials, or if you mesh is just too broken to bake properly. Luckily for me, it's looking like the first bake went decent' I did have to go back and reimport the low poly because I forgot a letter or two on a couple things, or forgot the capital letter. Once that was fixed, I came back and rebaked, and this was the result. Looks pretty good so far. Not too sure how well the inside baked though because the doors are in the way but I'm sure it's not too bad (dont worry, I will make sure!).
There will be the odd baking error here and there which I can fix later if I have the time, but other than that, I'm currently happy with how it turned out. I just need to create and ID map and I can start to texture properly.


Comments
Post a Comment